
Highway guardrail serves an important purpose in the safety of vehicular and pedestrian users alike. Although it may seem like a mundane part of the system, the design of highway guardrail is just as scientific and engineered to exacting standards as the rest of the highway.
This article will summarize the design process for highway barriers as per the Alberta Transportation Roadside Design Guide. The specific requirements in Cities may differ.
Clear Zone
Each highway has a “clear zone” within which hazards cannot be present. This is defined as the width of adjacent border area specifically allocated for use by an errant vehicle. In plain english, the clear zone is the area adjacent to the highway in which all items must be engineered.
Generally speaking, there should be no hazards in the clear zone. If a hazard must be present, a barrier (guardrail) must be built to protect motorists from the hazard.
Most signs have steel breakaway or wooden posts and are not considered a hazard, as they will easily separate on impact. Culvert ends, bridges, canals, structures, and the like are considered hazards. A long slope is also considered a hazard, but this has a separate design process, detailed below. Most of this article will deal with a hazard within the clear zone.
The steps to performing a guardrail design are:
- Eliminate the need for guardrail
- Determine the Clear Zone
- Determine Runout Length
- Calculate Guardrail Length
Eliminate the Need for Guardrail
The first priority is to eliminate the need for the guardrail in the first place. If the hazard can be,
- Removed
- Redesigned
- Relocated, or
- Reduced in severity
this should be done to avoid the need for the guardrail. Generally, there is an economic trade-off associated with these actions, so a cost-benefit analysis can be performed to ascertain whether these four actions are feasible.
Determine the Clear Zone
The size of the clear zone is determined by consulting table H3.1. It depends on the design speed of the highway, traffic volumes (AADT), and the slope of the road sideslope. Clear zones range from 2 m to 15 m. If the road is on a horizontal curve, an adjustment factor increases it to account for the increased likelihood of a vehicle becoming errant. The flatter the sideslope, the smaller the clear zone. Also, large fill slopes have greater clear zones versus cut slopes because the errant vehicle is traversing a long downward slope rather than upward.
Determining if Guardrail is Required
It is necessary to calculate a “clear zone” which is a distance from the pavement edge within which there should be no hazards. If a non-breakaway appurtenance must appear within the clear zone, a barrier is required. The size of the clear zone is dependent on traffic volume, design speed, and roadside slope.
Hazardous Slopes

When there is no hazard that requires mitigation, it is still possible to have a slope that is itself considered a hazard and must therefore be protected against with traffic barriers. For example, when a road with a high sideslope is being designed, these criteria will come into play.
That being said, even for hazards the slope and vertical distance of the sideslope must be considered. For example, even a culvert that is under a large fill must have a safe sideslope above it in order to avoid guardrail. Hence, all projects need to consider this.
In this case, figure H3.4 is the governing design criteria. The designer must consider the Embankment Slope Ratio (sideslope) and the Embankment Height.
If the roadway ends up within the shaded area, the slope is considered dangerous and must be protected with barriers.
Runout Length
Once the need for guardrail is established, the first step is to calculate the runout length. This is defined as the distance from the hazard to the point where a vehicle is assumed to leave the road. Obviously, the longer the runout length, the longer the guardrail, but AASHTO provides the guidance for this value based on traffic volume and the design speed of the roadway.
| Design Speed (km/h) | Traffic Volume (AADT) | ||||||
|---|---|---|---|---|---|---|---|
| >10,000 | 10,000 to 5,000 | 5,000 to 1,000 | 1,000 to 400 | 400 to 200 | 200 to 50 | <50 | |
| Runout Length, LR (m) | |||||||
| 130 | 145 | 135 | 120 | N/A | N/A | N/A | Barrier only required on site- specific basis as directed by the Engineer |
| 120 | 130 | 120 | 105 | N/A | N/A | N/A | |
| 110 | 110 | 105 | 90 | 80 | 40 | 20 | |
| 100 | 95 | 80 | 65 | 65 | 35 | 20 | |
| 90 | 85 | 70 | 60 | 55 | 30 | 20 | |
| 80 | 70 | 60 | 50 | 50 | 25 | 20 | |
| 70 | 60 | 50 | 45 | 40 | 20 | 20 | |
| 60 | 50 | 40 | 35 | 35 | 20 | 20 | |
Guardrail Length
The guardrail length is then calculated based on the intersection of the guardrail with the line connecting the runout length and the far end of the hazard (the clear zone length if it reaches outside the clear zone).
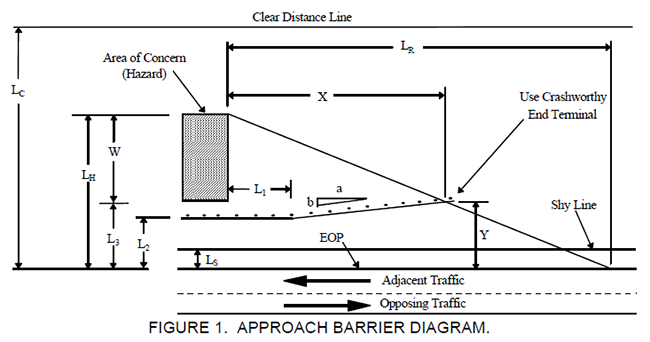
The guardrail at the leeward end is calculated in reverse. The runout length is applied to the opposing traffic lane instead of the adjacent lane, making the guardrail length a bit shorter.
Speak Your Mind